Tuesday, 18 January 2011
Mona Lisa with Hearts and Roses - GCSP6, Take 2
Yesterday I made a card following Shar's inspiration of using labels. My friend B gave me a pile of A4 label sheets, so I will be able to have more fun trying this out in the next weeks, as it is a fun technique with lots of possibilities. I printed the whole sheet with a freebie background from June at *Dezinaworld*, and stamped my image over one part of it , so I can still work with the rest of the sheet. I used my Mona Lisa stamp from LaBlanche, and stamped with archival ink which was then clear embossed. Then I mounted the labels onto a scrap of white card, which I matted with wine red before mounting it onto a card, which I stamped with script in *aged mahogany*. Added some hearts and roses and gave her a touch of lipstick and eye shadow, and it was finished.
And another nice surprise from *Gingersnaps* today, as I was chosen as a Ginger Gem again for my *Polar animals* tag. Many thanks to the team for their never ending source of inspiration and ideas!
It was fun trying something new - as always - and I will definately try this again.
Thanks for looking and have a good day!
Monday, 17 January 2011
Ginspiration Challenge CCSP6
For this challenge I have made a black and white card, inspired by Stephanie's elegant cardigan. I needed a *good luck* card for a friend, and as cows are a big fave with me, I used them here. They have been die cut from Kaisercraft paper, and I have mixed and matched the heads to make them more interesting. They have been mounted on to a piece of white paper left over from die cutting a lace edge, and the background has been stamped with text in archival black. The cows have been fixed with foam pads to give them more depth. I added some black and white prima flowers, a border of the same scrap paper, I just altered the writing at 2 places to *Moo* instead of me. Then I mounted it all onto a black card, and that was it - udderly simple, and I hope the recipient will feel mooooooooooved by it. The eyes and flower centres have been dotted with a spot of liquid pearls in red, and then I added a matching tag with a sentiment. Was fun to make, I think I will try the other Ginspiration challenges, too!
Thanks for looking and have a nice day!
Friday, 14 January 2011
Masking Challenge for *Simon Says*
This is my entry for the *Simon Says* masking challenge. The background has been masked with *garden ironworks* from *My Tattered Angels*, and sprayed over with *Juneberry wine* from the same company. I then cut the tag to match the contours of the pattern. Then I decided to keep it monochromatic, so cut the tree and birds in a matching colour using coredinations paper, which has been lightly sanded. The fence is also a TH die. The tree has been dotted with a few spots of liquid pearls in silver. As a finishing touch I added two stars in white with some lilac liquid pearls dotted in the middle.
It was, as always, fun to make. Thanks for looking & have a nice day!
Thursday, 13 January 2011
GC83 Polar animals Challenge
For the polar animals challenge I used a photo of Knut, a bear that was abandoned by its mother and brought up in the Berlin Zoo by zookeepers. He was a real cutie, and drew a lot of fans who queued for hours to see him. I have cut the top part of the photo away, inked the edges, and mounted it onto a tag which has been distressed with TH *faded jeans* and white embossing powder. I cut the pic of Knut a tad wider than the tag and just stuck down the edges, so that Knut seems to stand in front of the tag.
I stamped a circle with resist ink to make the moon. To finish it I inked the edges, and added a few stars and a snowman charm.
It was, as always, fun to make. Thanks for looking!
Wednesday, 12 January 2011
Fairy arch for *Gothic Arches* Challenge
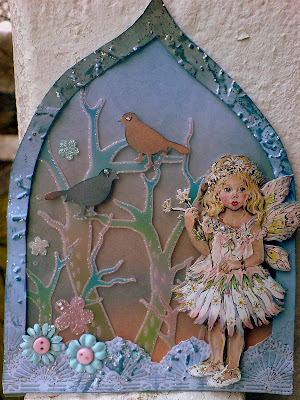
This time I have made something a bit different for the fairy challenge, and managed to use up some things which have been slumbering in my cupboard for a loooooooong time. But I thought for a fairy challenge, they would be just right. The background has been distressed with TH inks in gradient colours, and has then been covered with acetate printed with trees and then outlined with glitter. The fairy was from a decoupage sheet that I won from a blog candy, so I inked the edges, layered her, and added some ice blue stickles. The top arch has been cut from a scrap of paper, embossed with a TH folder to give it depth, inked with faded jeans and then rubbed with a bit of stickles, too. Added two punched birds, two prima flowers with mini buttons and a few tiny glitter flowers. It's nice to try something different once in a while, and it will be sent to a nice little girl who will be 9 next month and who just loves fairies, especially when they are pink, pale blue and glittery!
Thanks for looking and have a nice day!
Tuesday, 11 January 2011
Ginger gems, a LIIU challenge & a lazy day.....
Today I had great problems leaving my bed, as I had a bad back on the one side - oooops, how can you have your back on one side???? And I don't mean my backside either....
OK, I'll start again. This morning my back was hurting. This made it difficult to roll out of my bed, but after my first coffee everything started to feel better....
And then -
And then - I saw I had been chosen again as a *Ginger gem* for my *white glitter*challenge entry - woohoo! Thanks to the team for the inspiration and encouragement, we have a great bunch of ladies there!
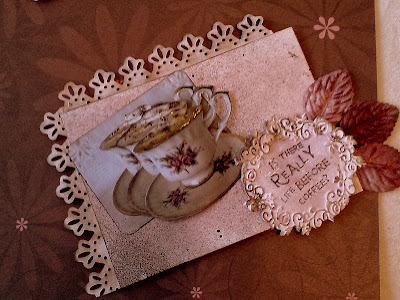
Yesterday evening I made a card for the LIIU Challenge #8, anything goes, and as the theme over on Gingersnaps was beverages, used that theme again. The background has been distressed with TH *Victorian velvet* & *Leather* glimmer mist from *Tattered Angels*, before randomly stamping it with a justrite stamp *Is there really life before Coffee?* and using Adirondack *espresso*. The tea cups have been stamped with a freebie from the *Craft Stamper* magazine, cut out, coloured and hand doodled, and then decoupaged. The vintage lady pic is from LaBlanche, the metal corners also. I placed a piece of brown card underneath it, which forms a little hiding place on the back into which I can pop an invitation to coffee.
It was, as always, fun to make - especially with this theme - and the rest of the day I have spent daydreaming, thinking about what I might do next and generally avoiding housework.
Thanks for dropping in, and have a good day!
Monday, 10 January 2011
GC85: Chestnut Theme Challenge - Hot Beverages
For me there can be NO discussion about which hot beverage I like the best - it was, is, and will be - COFFEE!! I love the smell and the colour of it, love watching it coming out of my coffee maker, and have a large collection of different coffee cups and mugs. The first thing I do everyday after rolling out of bed is to stagger to my machine, switch it on, pop in a capsule and watch the aromatic brown fluid run into the foamy milk....
For this challenge I decided to make a LO. The background paper is from K & Co *Neapolitan chocolate daisies flat*. The die-cuts are from Sizzix, and the wings from Melissa Frances.
I took a photo of an antique cup and saucer which I inherited from my Great- Aunt, natually filled with cappuccino. And I do want to emphasise that the dollop of extra cream on top was only for the photo. Well, I did drink it afterwards, I couldn't waste it, could i??
I printed the photo 3 times, and cut out 2 of the pics and decoupaged them. The coffee in the top cup hs been glazed with glossy accents and dotted with some stickles in cinnamon. The background is a ceramic card, distressed with TH Victorian velvet and Adirondack *espresso*, and sprayed with *leather* from *My Tattered Angels*. The card has been edged with die-cut lace which has been distressed to match. The text stamp is part of a *Justrite* coffe stamp set, and has been edged with a border made with a cuttlebug die and embossing folder. The leaves and bling are from Prima.
This was another fun challenge, for which I drank lots of coffee for inspiration.
Thanks for looking, and have a good day!
Update!
Last night I had the *brilliant idea* to make this into a canvas. Took a 15x15 one, distressed it with inks and sprays to match, and mounted the LO in the middle. Now I have a new picture for my kitchen wall, and it is hanging near the coffee maker!
Subscribe to:
Posts (Atom)